Sabre 5 c/n 1111 is owned by Tom Heldt and is now being restored
in Neuhardenberg, Germany (for history of the aircraft, scroll down
the page). One of only six former Luftwaffe Sabre 5s to survive, c/n
1111 has been rescued from an uncertain fate by Tom Heldt and is now
being restored in the former East Germany.
September
2010 Update
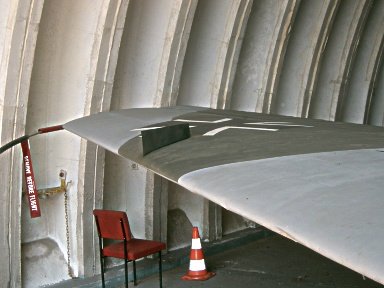
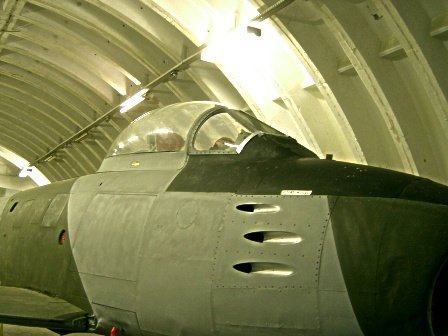
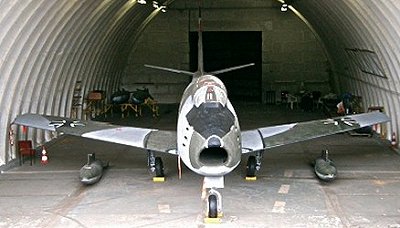
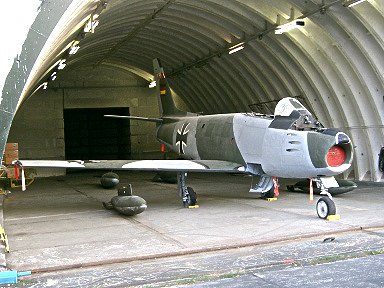
Now that Tom's Sabre is mobile,
he's able to get the aircraft out of its hardened shelter on special
occasions. With no natural light (i.e. windows) in the shelter it's
great to see the aircraft out in the open once in a while too! Over
to Tom again:
"The project still goes on and
the main restoration was finished last year. Now only minor work needs
to be done, and a project like this is never really done. One weekend
this July we managed the following:
- Inflate the tires and grease the bearings after the long hard winter
in preparation for the ROLLOUT(!)
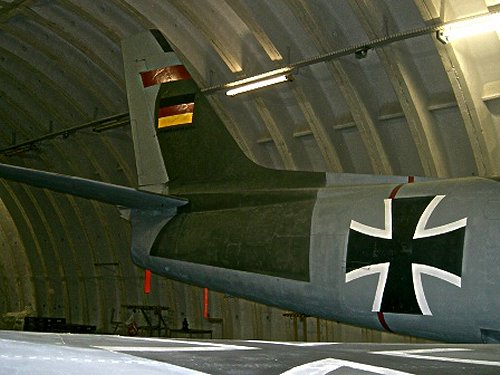
- Apply the patch of the WasLw 10 on the fin
- Not only install the red and green positionlights, but also make them
light up again!
- Start applying all the stencils on the airframe with maintenance instructions
etc – a project which will take a long time
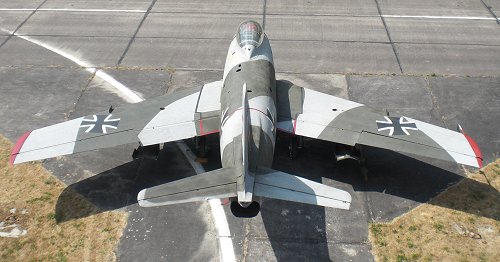
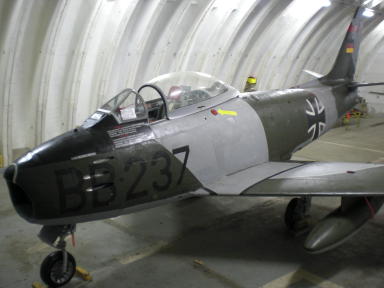
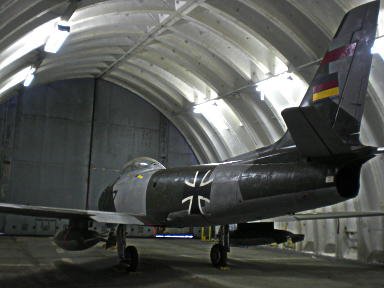
- And, we finally were able to get the Sabre out of its hangar for a
photo session – ROLLOUT!!!
It was not so easy to move the
Sabre in and out of the hangar, since the MiG shelters are fairly narrow
and only leave about 40cm on each side from wingtip to the shelter wall
– not much space to maneuver. Then, these Shelters have rails for the
shelter doors which stick up about 5cm from the ground which you have
to overcome. There are metal ramps to ease this, but it still is a challenge
for an aircraft which had to be put together again and is not so stable
as an operational aircraft. There is a lot of moving and shaking going
on when you pull/push the Sabre over these rails, and boy does she move
when she rolls over these things! But, the result was in my mind phenomenal,
it looks great.
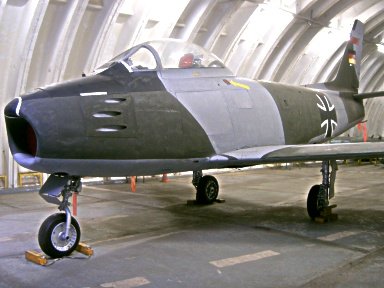
Of course she will never pass
the close-up inspection of an aircraft restoration team, but this was
never the aim. We put her back together to make her look as much as
possible as when she was operational, including the cockpit. After all,
we only used the normal tools you have on average in your garage and
aluminum sheets and rivets from the local hardware store.
We have visitors who come to
look at the MiG-21 across from my shelter and who come visit my Sabre
every time we open the doors, even though we are far from anywhere out
there – people still come out there. What surprises me the most, many
people ask us if we will fly the Sabre that particular day, many think
it is in flying condition! Amazing."
Hear hear! I did have a rather
irate email some time ago from a reader who thought I should put a warning
on this web page to let people know that Tom's Sabre is not being restored
to fly. As Tom says above, the aim (and I should point out that most
of this work has been done alone and in less-than-ideal conditions by
Tom) was to get the aircraft back in one piece. My opinion is that not
only has Tom done a great job of that, but he's also saved this machine
from the scrapman and put it back into a state where people can enjoy
it. My hat's off to him for that.
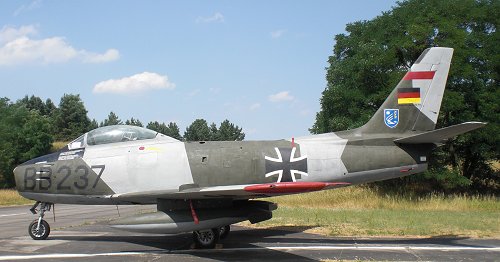 
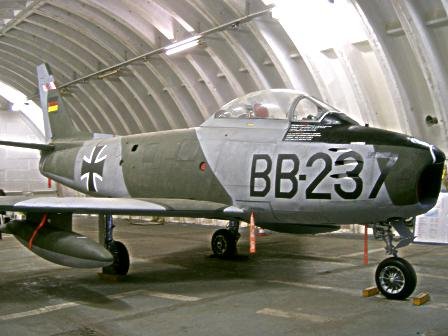
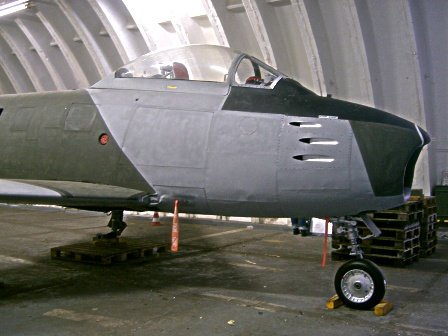
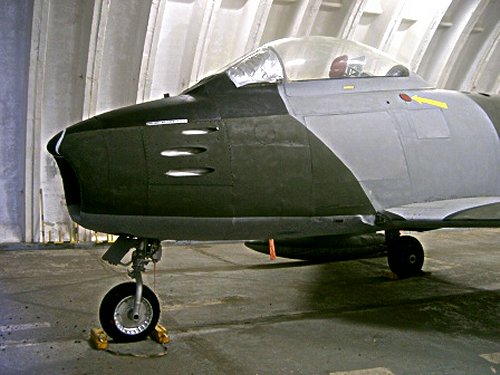
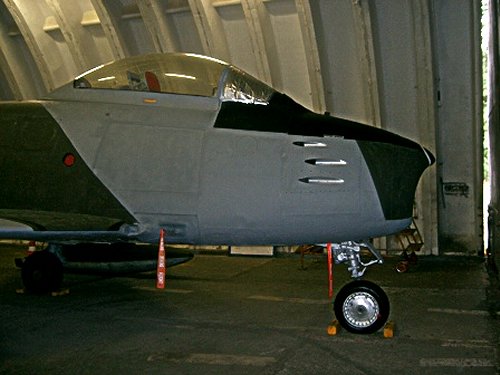
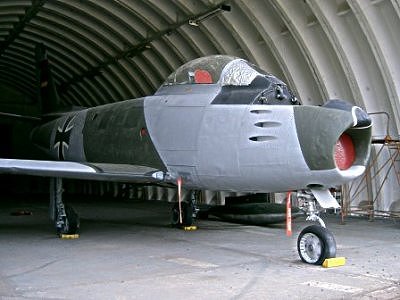
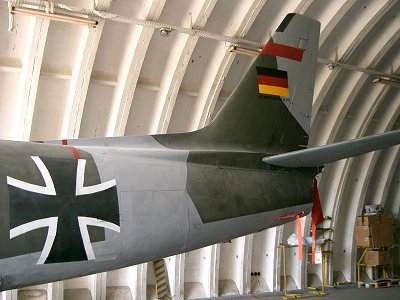
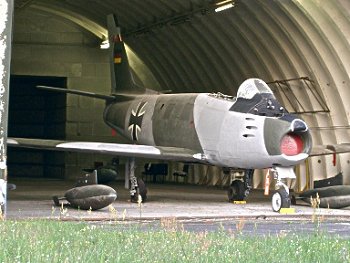
(above) - Well it sure looks like a Sabre! Great to see it in the
sun too.
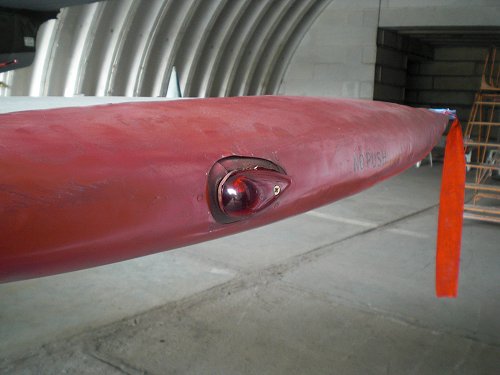 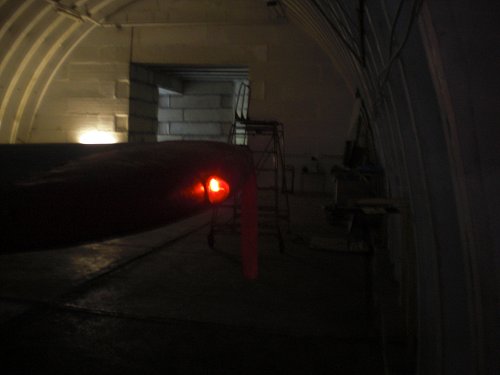
(above) - Wingtip light fitted - and functional.
January
2010 Update
Tom Heldt's Sabre 5 continues
to be restored to its former glory, though work has to take a back seat
to Tom's other priorities. With work inside the shelter being at best
uncomfortable during the winter months, Tom has put '111 into hibernation
until the warmer weather arrives:
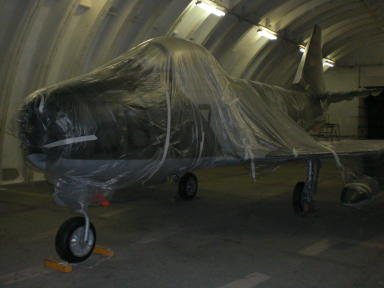
"I went to the Sabre to prepare
it for the winter. I completely cleaned the aircraft and then applied
a layer of WD-40 oil to the whole aircraft to prevent corrosion. This
took two days, but it had a nice effect on the overall appearance of
the Sabre. Then I completely wrapped the aircraft, basically like it
is done for long-term storage after a thin layer of oil is applied."
A further update will follow
as and when. Until then, enjoy these recent shots:
April
2009 Update
Progress on '111 continues -
presently concentrated on the cockpit area, which had previously been
gutted. Tom is making great progress here and slowly the 'office' is
coming together:
"Over the winter, I have found
and purchased the following parts: B6 G-meter, standby compass, clock,
ARN6 loop antenna and the ARN6 radio compass control panel. The Main
Instrument Panel is now complete. In addition, I have restored the nearly
completely-destroyed bent left-hand panel and scratch-built the instrument
panel for it, which I then installed on it. This left-hand panel includes
the trim controls and air conditioning/pressurization. I also scratch-built
the IFF Panel, the panel to check the Gunsight and others. The cockpit
is now almost complete, I only need the gunsight itself now. I do have
to figure out how to install the heavy ARN6 Loop Antenna, I do have
the support bracket for it."
In March Tom went out to the
aircraft and installed all the instruments and panels. I hope to bring
you more photos of the completed cockpit soon. For now enjoy these shots:
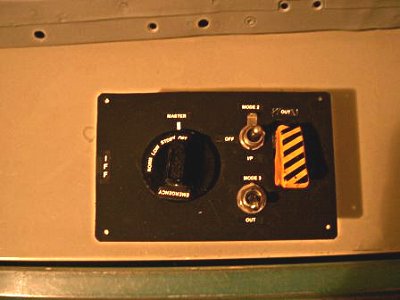 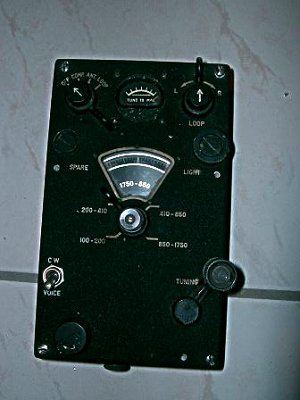
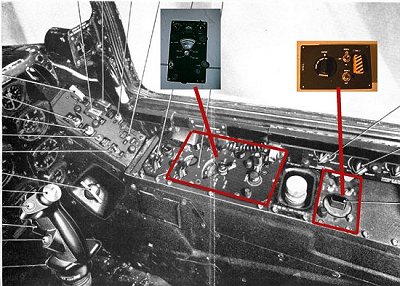
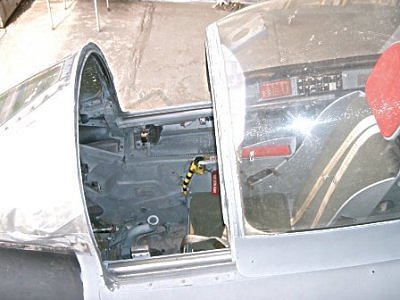
Above left - Tom's
scratch-built IFF panel. Above right - the ARN-6 radio-compass control
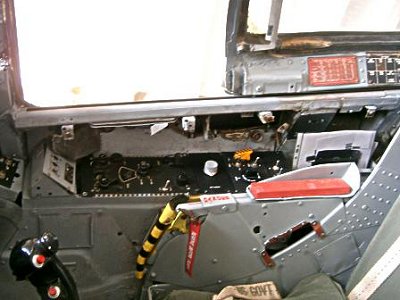
panel. Below is a cockpit location shot, showing where they fit (left)
and on the right, as now installed in the aircraft.
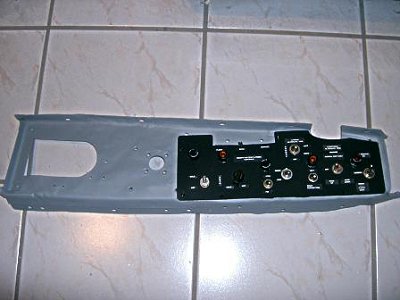 
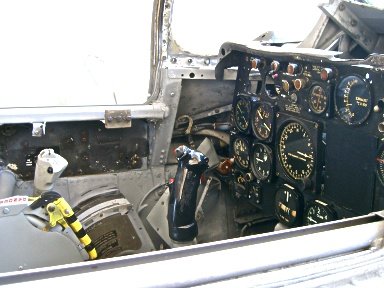
Above left - Tom's restored
panel for mounting the instruments and switches on the port-side console.
Fitted in this shot is the panel that mounts pressurization, heating
and trim switches. Above right - the panel installed in c/n 1111.
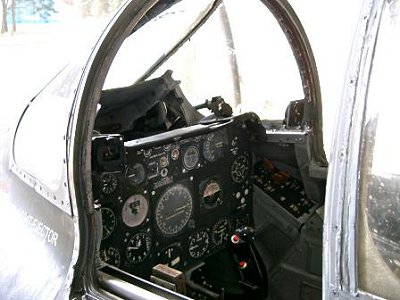 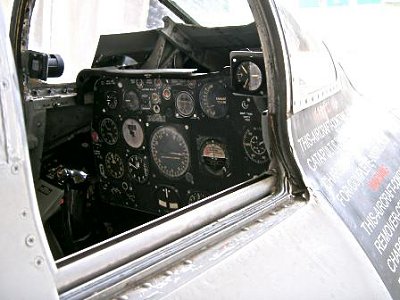
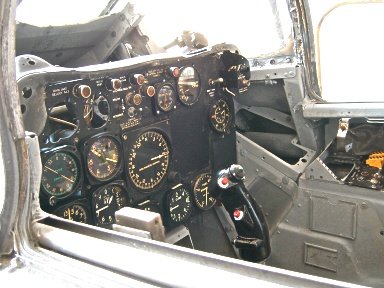
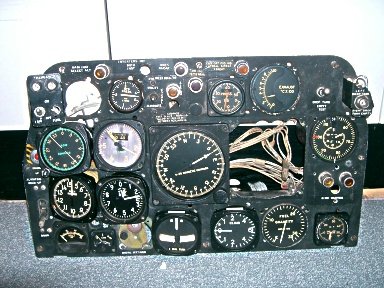
Above - Two shots of the main instrument panel in c/n 1111. Tom has
achieved impressive results.
June
2008 Update
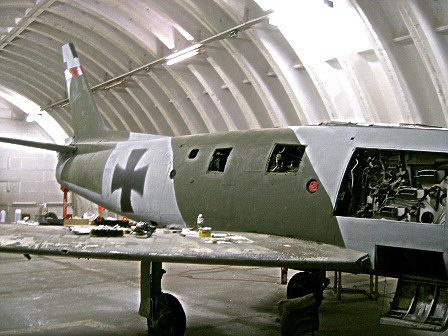
"Now, with the warmer weather
I have gone to work ont he Sabre again and this is wat I have done to
it: I did repaint the complete front section of the aircraft and applied
the Registration also now on the left side of the aircraft. In addition,
I finally managed to get the until now still from underneath the fuselage
and between the wings located huge sheet metal piece. As you can see
on the pics, it is now finally secured, sanded down and primed. Then
we totally sanded down the bottom of the wings and the blue paint from
its heydays came to light, I have not decided if I will leave it blue
or paint it grey."
Above - c/n 1111 is now well on the road to recovery with drop tanks
fitted and the paint scheme coming to completion.
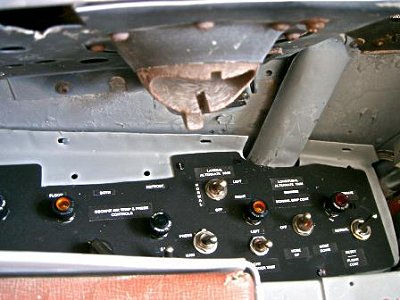
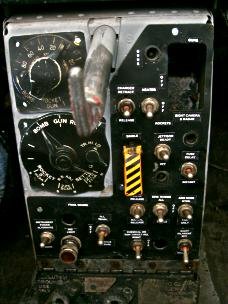
"Then, I installed the engine
starter and exterior lighting panel which is located on the right hand
side console in the cockpit. I build this panel from scratch over the
winter month. In addition, I also build from scratch the sub weapons
panel which is located below the main instrument panel. It was totally
destroyed and ripped out of the attachments from the unit which also
houses now again the two selectors for the weapons."
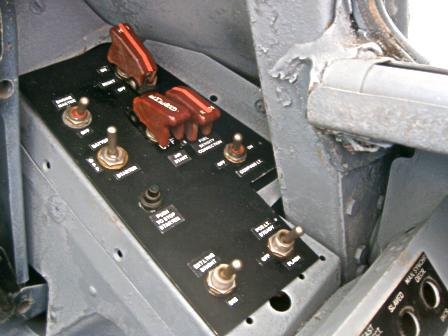 
Above: Attention has now
turned to the interior and the laborious job of fitting new panels
has begun.
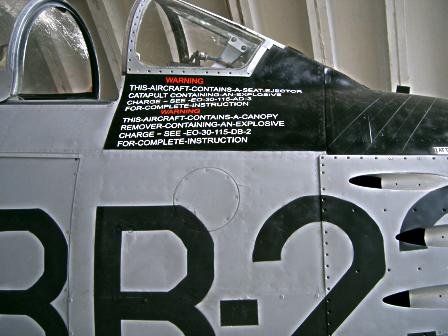
Above - Another essential
piece restored - the prominent stencil block below the side windshield.
"Since it was my
birthday in April, my wife had the white lettering made which is located
below the cockpit windows and explains that the aircraft is equipped
with a seat and canopy ejector. I applied the one on the right side
and it looks fantastic. To top it off, my wife baked a special birthday
cake which had my Sabre made out of frosting."
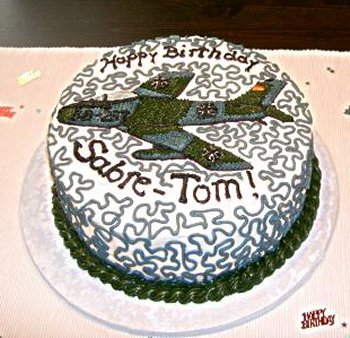
Above - Tom's
birthday cake - nice one!
November
2007 Update
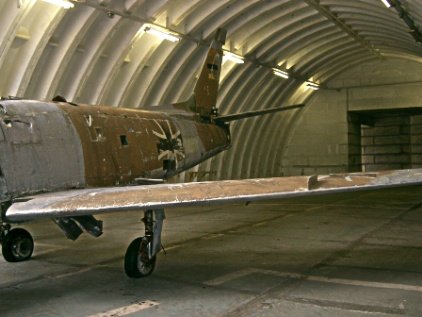
"We finally received the wingtips
back from complete restoration which included taking all the huge dents
out and making them look like new again. They were installed again and
painted red. The pitot tube was also installed in the right wingtip."
 Above - A view of the right
wing showing the red-painted wingtip newly-installed on Tom's Sabre.
Above - A view of the right
wing showing the red-painted wingtip newly-installed on Tom's Sabre.
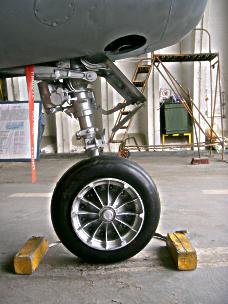
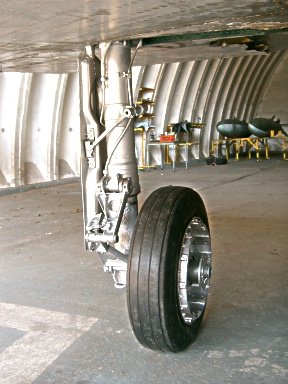
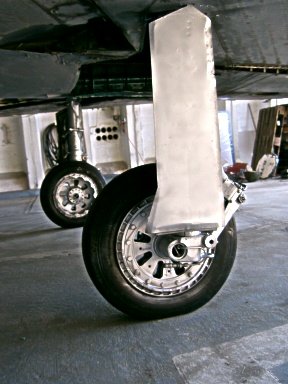
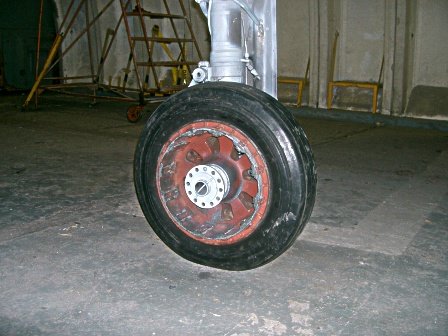
"I finally found the time to
change the nosewheel rim. The rim which was on my Sabre was a late model
rim which was used mainly on Sabre 6. I bought the Sabre 5 wheel on
eBay and restored it. After restoration I took the new tube and tire
and installed them on the rim. Now, my Sabre has the original Sabre
5 nosewheel on it."
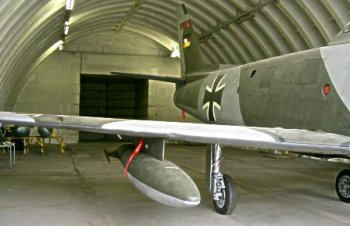
Above: The newly-fitted
120-gal 'quick-release' drop tanks finally in place.
"Another huge step was the installation
of the two 455 litre (120 gallon) drop tanks. Though all the attachments
and fittings are missing, we managed to build/weld a rail-type attachment
which connects to the wing and provides perfect fittings for the ball-shaped
attachments of the tank itself. Now, we are able to slide the tanks
on and off from the back of the aircraft if necessary. It is an easy
two man lift. This was very important to me in case the aircraft has
to be moved to another location someday."
Above - As
noted above, c/n 1111 now sports the early 'spoked' nosewheel which
characterised the Sabre 5.
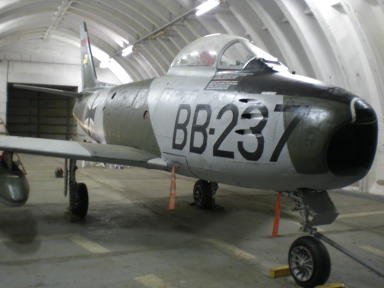
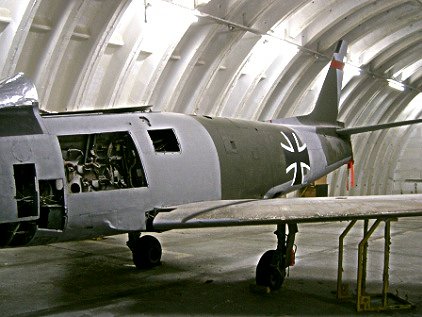
"The latest work on the Sabre
included applying the original Luftwaffe- Registration "BB-237" to the
right side of the aircraft."
 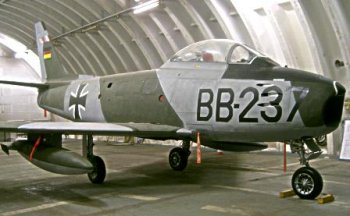
Above - c/n 1111 looking almost complete and a far cry from the
wreck that Tom first bought.
As mentioned in a previous update,
Tom is still missing a few instruments. Can you help? (B6 Accelerometer,
Artificial Horizon and Engine Oil Temperature Indicator ). Please contact
Tom if you can at SabreBB237@aol.com
.
June
2007 Update
"With the warm weather we are
having, I have been going more often to the Sabre now and here is the
April update for you including pictures."
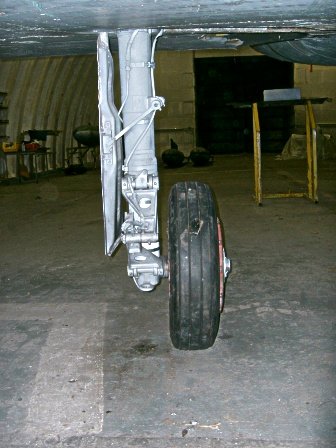
"I finally managed to restore
the landing gear including painting it, with the exception of the small
left-hand door which is located on the landing gear itself. I also completely
sanded down, primed and painted all the wheel wells after removing the
left-hand, totally destroyed main landing gear door which covers the
wheel well."
Above - The main landing gear looking almost complete: a far cry
from the pictures from earlier in the restoration.
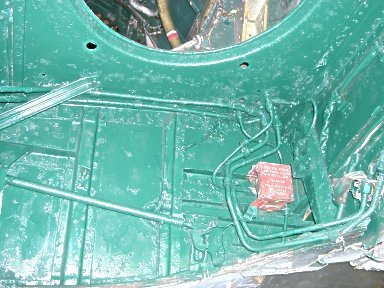
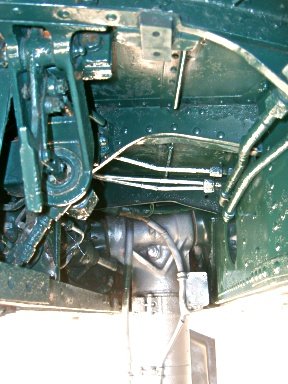
Above - The main gear bays
primed and ready for painting.
"The missing "fence- extending
leading edge" on the right hand wing was built from scratch and mounted.
Also, the two small leading edge pieces which attach to the front wing
root were finally installed making the wing look more complete. "
Above - at left, the missing
wing fence now back in place and at right, the wing root fairings
also fitted. The latter were a feature of the '6-3'-winged Sabres,
and covered a small portion of the ammunition door/step, where the
extended leading edge covered it at the root. .
"Another main step was the installation
of the main instrument panel, most of its instruments , the installation
of the control stick and the throttle into the cockpit. "
Above: The instrument panel in place on c/n 1111. With the external
transformation almost complete, Tom is now looking to restore the
cockpit area.
"The wing edges are currently
at a local metal shop for restoration and hopefully they return soon
for installation and completing the wings. Also, the early model nosewheel
is currently undergoing restoration."
"As you can see on the pictures,
the Sabre is making good progress I think."
As mentioned in a previous update,
Tom is still missing a few instruments. Can you help? (B6 Accelerometer,
Artificial Horizon and Engine Oil Temperature Indicator ). Please contact
Tom if you can (email at bottom of the page).
April
2007 Update
"After one of the main struts
sank in, we had to focus the work again on the landing gear. I found
someone who [could] build brackets which I could install around the
extended struts."
"I had to jack out the left
strut after it sank in by using a car floor jack. After that, I installed
the brackets on both main landing gear struts. Then, to even out the
extreme uneven height to the nosewheel, I also installed a bracket around
the strut of the nosewheel which resulted in lifting the nose by 5cm.
This made a huge difference and the aircraft now sits secured on its
enforced struts."
"Also, I had special bearings
made in order to fit the main wheels correct and straight on the main
landing gear. I also purchased new brake flanges and installed them,
too. Now, the main wheel is straight and secured on the axle."
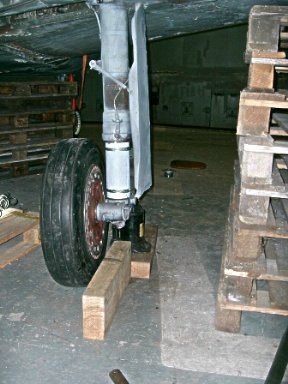

Above - The main landing
gear's crooked stance being corrected and the nose gear extension
also now correct.
"Even though it was cold like
a freezer in the shelter in February and working a whole day on the
floor under the aircraft to fix the landing gear almost froze me up
completely, I did not stop there. The next day, I managed to install
the right windscreen which I had specially made. "
Above: The right windscreen panel in place on c/n 1111. The external
transformation is almost complete.
As well as the exterior work
on the aircraft, Tom is now also looking to complete the interior restoration:
"I found the original Instrument
Panel and it arrived yesterday [30 March 2007]. On the second pic you
can see all the intruments I already have for the main panel. Now, I
am looking for all the instruments from the left and right consoles
in the cockpit. I do have the throttle lever and a replica of the control
stick."
Yet again, Tom's single-handed
dedication to restoring this aircraft is an inspiration. More updates
to come as Tom progresses. Hopefully warmer weather will give him better
working conditions.
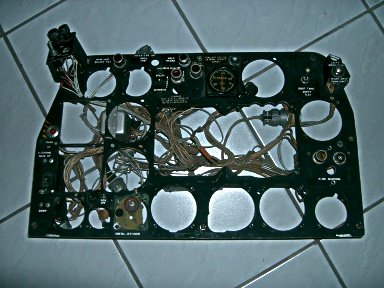 
Above - The new instrument panel for c/n 1111 as it arrived (left)
and with Tom's instruments installed (right). Can you provide the
missing instruments? (B6 Accelerometer, Artificial Horizon and Engine
Oil Temperature Indicator ). Please contact Tom if you can (email
at bottom of the page).
September
2006 Update
"My father picked up the Upper
Access Door in Bremen in order to have it on the aircraft for this years
airshow at Neuhardenberg airport. I was able to attach the Upper Access
Door onto the fuselage without bigger problems. The latches were greased
up a bit and then they worked perfectly, bringing the completion of
the outer part of the Sabre a very significant step ahead."
"I was also able to tackle the
biggest problem with success, the totally corroded mainwheels. After
trying all kinds of methods to get the "nut-wheel retaining", securing
the mainwheel, off the axles using methods like normal tools, heating
the nut up or spraying it with rust-remover, the only thing left to
do was to cut the nut off. I had asked many restoration experts but
this was the only and last solution. I cut them off and during the process
they got red hot and after cutting one small piece off it they cracked
open a bit. With the use off a screwdriver and a hammer I was able to
get the nut off the axle, finally."
"The wheels still did not move
since the brakes were set and it was not possible to loosen the brakes.
Pulling the whole wheel assembly off the axle was also not as easy as
one might think. After hitting the rim with a small sledgehammer from
the outside towards the inside, a big loud crack could be heard and
the wheels finally started to move off the axle. A few more hits with
the hammer and then I was able to pull the very heavy mainwheels off
the axle! What a success!"
"For now, I put two new mainwheels
on the axles so that the aircraft does not sit without wheels and so
I am able to move it. The wheels are the same size, though they are
from a T-33 and the bearings are different and do not fit correctly
onto the axle. I will have to restore the old wheels and then put them
back on the aircraft. I did the same with the nosewheel after purchasing
a new tire and a new inner tube for it. It now looks almost like new."
I hope to bring further updates
to Tom's project soon (and hopefully I'll be able to post them quicker
too!). For now, here are some photos to illustrate the current status:
Above - The upper access door finally in place and painted - another
big step in the restoration.
Above: 1111 in its shelter showing further work done by Tom. Note
the drop tanks ready for installation and slightly skewed mainwheels
- due to a bearing mismatch of the T-33 wheels.
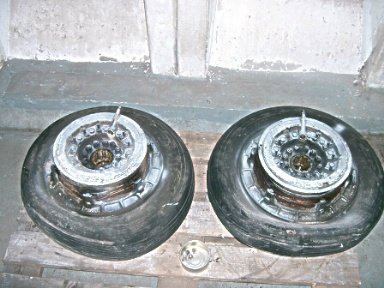
One more part of the jigsaw - the correct mainwheels, awaiting restoration.
May
2006 Update
No-one can accuse Tom of hanging around, at least as far as his Sabre
is concerned.
At the beginning of April, Tom returned to Germany from a 6-month work
assignment overseas, and in the intervening period managed to secure
the two major missing parts for the Sabre - a canopy and an Upper Compartment
Access door. The canopy was originally fitted to another ex-Luftwaffe
Sabre, Mk. 6 c/n 1675, which ended its days in the USA with Flight Systems
as N80FS (this aircraft is now in private ownership in the States, and
now fitted with an airworthy canopy - the item which Tom has was presumably
replaced for a better item). It is thus fitting that this 'German' canopy
has returned home to help out one of its brothers. Tom found the canopy
through an ad he posted on an aircraft parts page on the internet. He
also managed to get a great deal on a tire for the nosewheel and also
the right windscreen. His wife managed the payment and the shipping
of the parts since Tom was abroad at this time. What would we do without
our spouses? All parts were picked up by one of Tom's brothers-in-law,
who runs a self-employed trucking business in El Paso, Texas. He picked
the parts up in Orinda, California and delivered them to El Paso, Texas.
During the Christmas 2005 holidays, Tom's wife visited her family there
and, together with her youngest sister, delivered the parts with her
pick-up truck and her fiances trailer to a shipping company well known
to them. They then crated the parts for overseas shipment and the crate
was shipped via Houston, Texas to Bremen in Germany. On March 1st, 2006,
Tom's father drove from Berlin to Bremen and picked up the crate with
a rented van and delivered it to the shelter in Neuhardenberg. In Neuhardenberg,
local staff from the airport there helped Tom's father to offload the
crate. What a family effort!
Tom was offered the Upper Compartment Access Door through an email from
a person that read all about my project on THIS website!!! It came from
Rick Clemens' Sabre 5, c/n 1090, ex-RCAF 23300 - another aircraft with
Flight Systems links, but this time as one of the Sabre 5s converted
by the company to drone use for the US Army. Other parts recently restored
for installation on the Sabre are an ejection seat from Sabre 6 c/n
1731 (ex-Luftwaffe) and the rudder mentioned above, believed to be from
F-86F s/n 52-4371. Gun blast panels were new old stock and had never
been installed on a Sabre before.
At the end of April, Tom went to work on the Sabre again and managed
the following:
"First,
we had to replace the rear bulkhead and the sheet metal on which the
rear canopy rails were attached. Both parts were completely removed
from the aircraft and left a huge hole in the back of the cockpit. Part
of the rear canopy rails were however still present, the front rails
are complete and in good condition. We inspected the canopy and found
that almost all the attachments/rollers that fit into the rails are
still present on the canopy. This made the installation of the canopy
fairly easy after fixing the rear part of the cockpit."
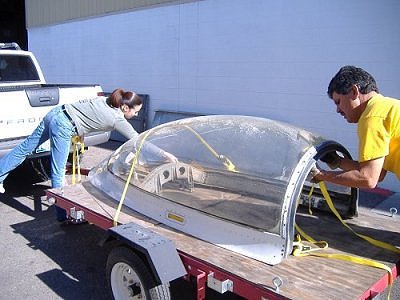 
Above - Views of the canopy being loaded in the USA (top left), painted
and installed on 1111 (top right), and a close-up of the restored
rails (bottom).
"I already had restored the
ejection seat which I bought on ebay and we were able to put it into
the Sabre and securing it on the new rear bulkhead which we built."
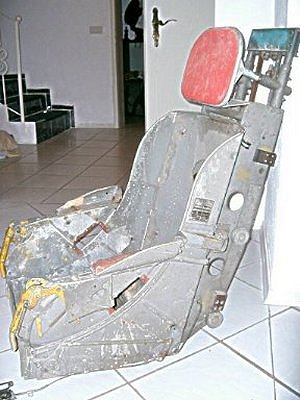 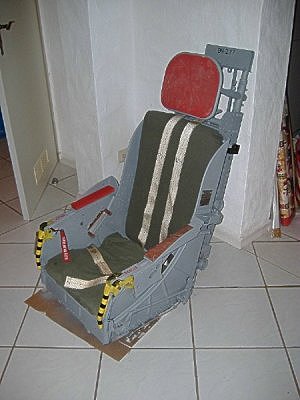 
'Before', 'after' and 'installed' shots of the ejection seat.
"After that, the canopy was
cleaned and painted from inside and outside. All the checklists inside
the canopy frame are also still present. We then fitted the canopy to
the rails and are even able to slide the canopy aft for about a foot.
It cannot be opened further since the rear rails are only about a third
of the length they used to be. The canopy handles on the left and right
side of the canopy frame are in good working condition and can be used
to slide the canopy."
The Upper Compartment Access Door should arrive in Germany in mid-June,
and can then be installed, therefore completing the exterior of the
Sabre. We hope to bring you photos of the completed aircraft as soon
as it all comes together.
The final part of the external jigsaw - the Upper Compartment
Access Door.
January
2006 Update
Mini update - Tom has now located a cockpit canopy, thus moving the
project significantly closer to completion. It was located in California
at a very competitive price, and Tom has also purchased the right windscreen
panel and a nosewheel tyre from the same seller. Since one of Tom's
brother-in-laws is operating a freight business, he was nice enough
to pick up the parts while he was in the area and the parts were shipped
via El Paso, Texas at the beginning of January.
The main parts that Tom needs to complete this aircraft are the Upper
Compartment Access Door (nose area, forward of windscreen) and the left
windscreen panel.
October
2005 Update
"The
Sabre was shown to the public for the first time in over 20 years on
an airshow at this airfield which was held on 13. and 14. August 2005
and people were very interested in this project. We had lots of picutres
of the restoration project for the visitors to see."

Tom Heldt's father (right) talks to visitors during the Neuhardenberg
airshow, 13-14 August 2005.
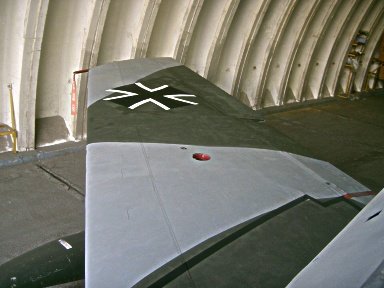 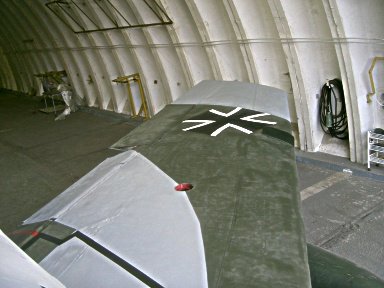
Views of the left and right wing restoration work.
"I went to the Sabre last week
again, [and] this time, work concentrated on the wings, as these were
still in not good shape. We managed to install the cut off piece from
the left wing, the leading edge along with about a foot of wing was
cut right from the wing root, I guess to access the bolts for taking
the wing off. Then we covered some holes on the left and right wing,
managed to fix the left guidance fence and then sanded both wings down
completely and covered them with primer. next we painted both wings
and applied the German Cross on both wings. Both wingtips are not yet
restored and have been removed from the wings for restoration. The flaps
and ailerons were fixed, but will need some more attention."
The Sabre now looking more
and more like she did in her heyday.
"After intensive work and letting
the paint dry for around 24hrs, we covered the plane competely to protect
it from dust and humidity. There will not be any work done on the plane
until March next year since I am deploying to Afghanistan."
August
2005 Update
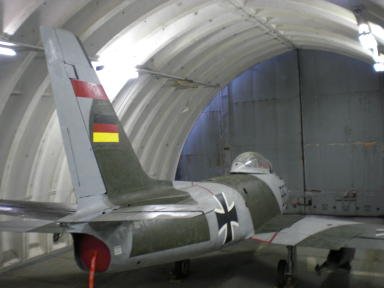
"We
finally managed to install the rudder! Although all the fittings are
missing we found a way to install it after one whole day of trying.
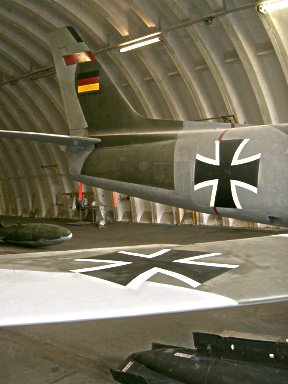
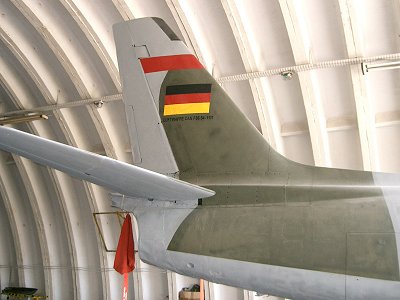
Now the complete tailplane is back together and I painted the German
Flag and the Lettering which you can find below the German flag on all
German military aircraft consisting of the word of service(Luftwaffe,
Marine or Heer) the aircraft flies for, in this case the LUFTWAFFE,
the aircraft type and the serial. In this case" LUFTWAFFE CAN F86 54-1111",
meaning Luftwaffe Canadair F86 54-1111. My wife has a good friend which
ownes a offset Printshop and she had them make this lettering for my
aircraft. How nice is that of her?!?!?!"
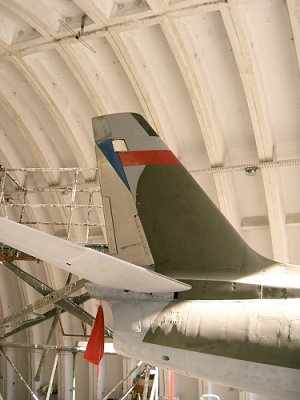 
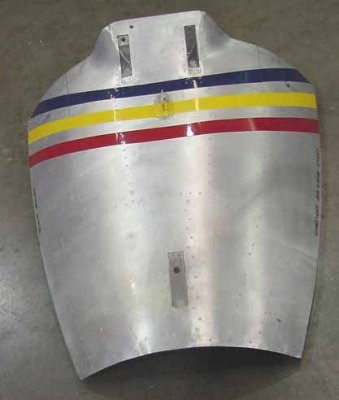
The rudder is finally installed! (before left, after at right)
Note the original markings on the rudder - from 36th FBW, Korea; Tom
bought the rudder from a dealer in Arizona.
"After that I started to cut
aluminum sheet metal so they could be riveted over the huge wholes which
were present on the forward fuselage. Since many of the "ribs" of the
forward fuselage were severely damaged I had no choice but to place
large pieces of aluminum over the complete areas and rivet them on after
I was able to secure the "broken bones". There was simply no other way
for me to do this since I am not a sheet metal expert. I got advice
from such an expert and he basically said there is not much else you
can do in this case other than replacing the complete skin of the forward
fuselage. He, my father and myself for that, were very surprised of
who much of a difference the sheet metal makes ones it was in place
and how well this "Aircraft Battle Damage Repair" -method looks. Just
one big whole is now left below the left gun blast panel because of
the lack of sheet metal I had available, though this will be fixed next
time. The aluminum and the rivets I purchased through eBay. In addition,
I just purchased two used complete mainwheels for the Sabre."
The rudder from the left side; note the lettering, "LUFTWAFFE
CAN F86 54-1111" beneath the fin flash.
July
2005 Update
Tom has had a busy summer of 2005, with c/n 1111 looking more like a
complete aircraft after many years. Over to him,
"[We] cut and riveted all necessary
remaining aluminum sheet metal in order to close the ugly holes the
plane still had on the front left. In addition, we cut and riveted sheet
metal for both gun bay doors, both radio access doors and one for the
engine access door on the right side. In addition, I managed to fill
the holes with yet more sheet metal where the gun camera used to be
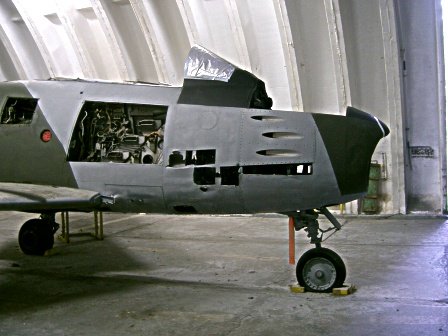
and surrounding holes that were present."
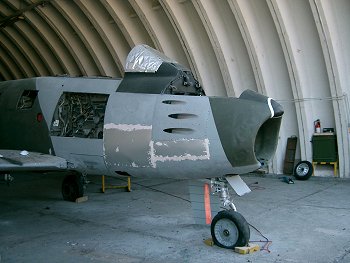
Final panelwork on the nose
section.
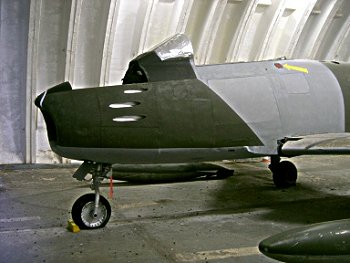 
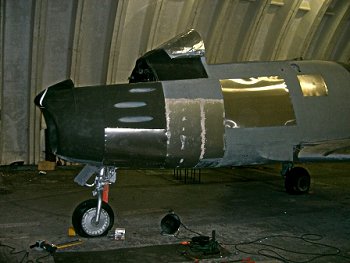
The nose painted and looking like
a Sabre (left); compare with the initial state of the airframe at right.
"We filled in the last holes
and sanded them down, then we applied yet another coat of primer and
then a first layer of camouflage. Then I fixed the huge chunks which
were cut out from both flaps and both ailerons. They were all fixed
on the top, the bottom half will be done next time. I also built engine
intake and exhaust covers."
 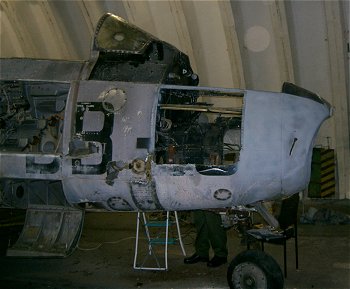
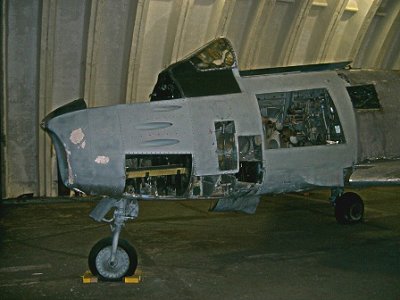
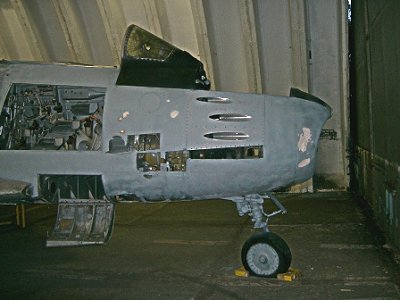
Right-hand side of the nose section, again 'after' and 'before'.
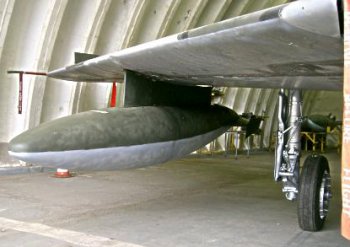
General view of C/n 1111 in its hardened shelter with Tom's latest
acquisitions - a pair of drop tanks - also visible.
"The two fuel tanks with pylons
I bought on eBay are also present on the pictures. I placed them in
front of the plane since the Sabre will be shown to the public on an
open day which this airport will hold on the weekend of 13/14 August
2005. The bigger tanks are still in the back of the shelter awaiting
pick-up from the new owner to whom I sold these tanks."
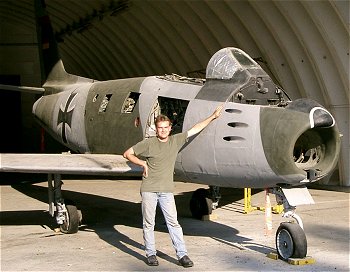
The man himself.
May
2005 Update
"I have been working on the
plane in March and April and the fuselage is now almost completely restored
from the tail section to the cockpit. The nose part still needs sheet
metal work which will be done next time I go to work on the plane."
Work continuing on the right-hand
fuselage side - German cross being applied at left.
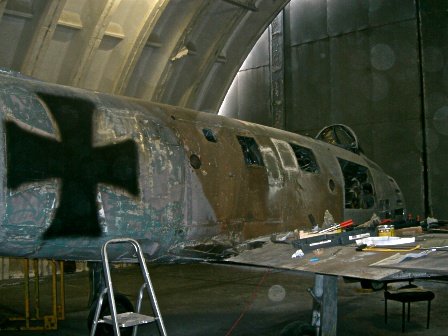
"I have restored the panels from
the left side which I took off the plane or found within the plane and
installed them. The holes on the left side were then filled in and sanded
down, completely covered with primer and a first layer of camouflage
applied. I also restored the Iron Cross to its original stage on both
sides of the fuselage. Then, I started to cut out the damaged fuselage
pieces on the right side of the fuselage, mainly on the center section
and riveted new aluminum sheets onto the fuselage and filled and sanded
the whole right side. After that, I applied primer and also a first
coat of camouflage."
Similar progress has been made on the right-hand side of the fuselage.
"I also managed
to finally complete the filling process of the huge dents/holes on both
sides of the intake and on the front of the intake. The radome I was
also able to restore using some special filling. I decided to apply
a first layer of camouflage paint so the progress is even more obvious.
I have reporters coming to the plane on a regular basis now and this
way the progress is obvious to anybody."
The forward fuselage is also coming together, thanks to filling
of numerous dents and holes, plus the restoration of the gunsight
radome.
"The next steps will be to finally
replace the skin on the front of the aircraft to finish the fuselage
and to install the rudder. All that is missing from the fuselage are
the maintenance panels, which will be replaced with original ones, or
for the time being with aluminum sheet metal to finally close the fuselage
up completely."
February
2005 Update
Early 2005 saw further work
completed on c/n 1111, as Tom explains,
"First, we installed the Gun
Blast Panels and also already used the primer to cover them. Next I
started to fill the holes and dents on the intake and forward fuselage
using normal car body filling from the local hardware store, an idea
which I received from a couple of people that are or have restored airplanes.
It all worked very well, though some of the holes and dents very so
deep that I had to use a couple of layers of filling to finally close
them. Next time I go to the plane, these filled in areas will be sanded
down and also covered with primer."
Forward fuselage
coming back together, with blast panels added.
"Next, as already mentioned,
we tackled the tail section of the Sabre. We managed to install the
cut off piece of the right elevator, you can see how it was missing
on the pictures of the planes arrival. Afterwards, we installed the
actual elevator, which was also cut off from the elevator assembly,
not an easy task, but we managed to install it."
Tail section coming together
and horizontal stab fitted. "Next,
we filled in all the holes on the fin and on the rear fuselage and primed
them before moving on to attach the panels which cover the area of the
fin and elevator. All these panels were severly bent and hard to get
back in place, all the screws and bolts were missing. We managed to
find bolts and screws that fit and were able to secure all of the panels,
though we were not able to install a bolt into every drilled hole that
holds the panels. The panels are tightly secured and the complete tailplane
is now put back together, though still without the rudder. We then primed
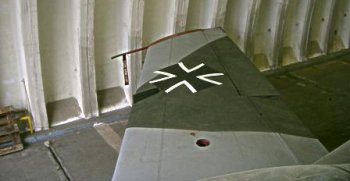
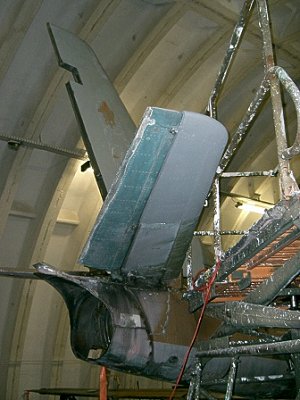
the complete tail section and I also painted the tail section, including
the red stripe on the fin that was applied to aircraft of the 2nd Sqn
of WaSLw10 [2./WS10]."
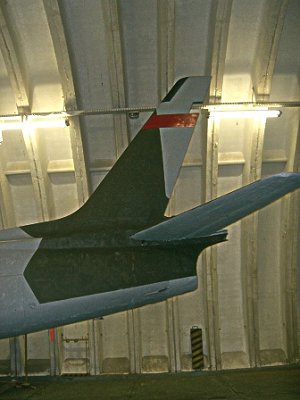 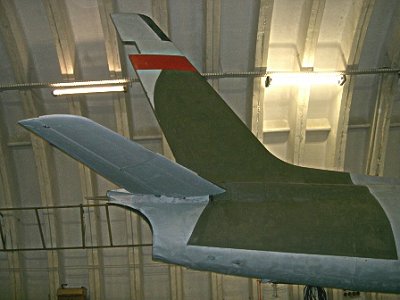
Tail section
looking better, with red stripe of 2./WS10 applied.
"After three work-intensive
days, the Gun Blast Panels were installed and covered with primer, the
complete tailplane, except the rudder, was put back together and also
painted. We also cleaned the shelter since the floor was covered with
lots of soil, wires, metal pieces and other junk removed from the plane.
Even though we were not able to install the rudder this time, we have
some ideas on how to attach it to the fin. Sadly, all the attachments
which hold the rudder were cut off from the fin, so it will not be an
easy task to install the rudder. This will be one of the tasks for my
next trip to the plane."
We had to clean the shelter also because yet another newspaper reporter
came by to take pictures of the plane for the article which was published
in already two newspapers! A local German TV- Station also came by to
interview us for a feature article on my aircraft an its restauration
which will be aired in Germany shortly.
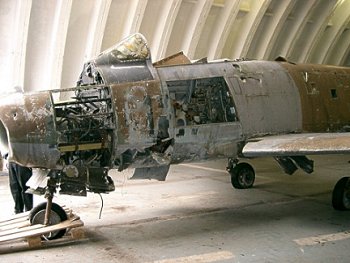
The
Start of the Restoration
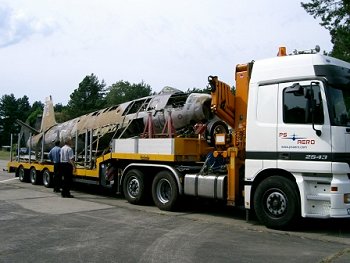
c/n 1111 arriving at Neuhardenberg on 24 August 2004.
In 2004 Thomas Heldt purchased
c/n 1111 and his first task was to move it back to Germany, where restoration
could begin. Tom managed to secure the use of an old hardened aircraft
shelter at the former East German base in Neuhardenberg. In August 2004
the aircraft arrived there, and restoration has now begun, assisted
by Tom's father. First work centred on the forward fuselage, and other
areas are now being tackled. Over to Tom now to describe what he has
done so far:
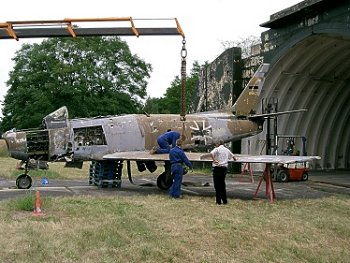 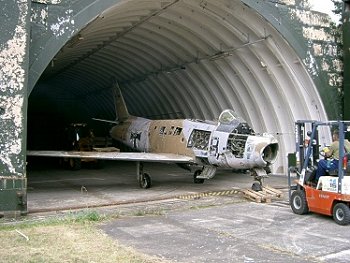
The aircraft
being reassembled (left) and moved into its hardened shelter.
"I already purchased many new
parts for the plane including the rudder, the gun blast panels, a new
rim for the mainwheel, a complete nosewheel and I also found an Ejection
seat for it on eBay!!!"
"We started to work on the tail
section and the fin/elevator, which will also be the main task next
time I go to work on the aircraft. I had to shift my plans as I was
able to get a nice maintenance stand free of charge from the airport
where the plane is located, they are particularly interested in my project
and are doing all they can to assist me. So I decided to focus on the
tail section since I have the maintenance stand now. I also have the
rudder and will try to fit it to the fin, although all the attachments
were cut off from the fin...we shall see. Nevertheless, I took all the
rust of the landing gear and already covered it with anti-rust spray
and primer."
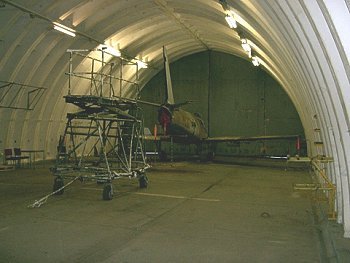
c/n 1111's new 'home' is
a snug fit, but Tom Heldt is lucky in being able to work undercover
on the Sabre. Staging visible here will allow easy access to the tail
section.
"Also, we took a whole
bunch of trash and junk out of the plane, especially from the cockpit
but mainly the engine bay, the result: 30+ empty bottles of beer,
two bird nests, one dead bird, smoke cartidges, one metal sign, cleaning
towels and so on. I used one of those industrial vacuum cleaners to
get all the dirt out of the plane, [which] was parked in the woods
next to the parking aprons for more than twenty years!!! I had to
empty the vacuum three times, it was full of soil each time!!!"
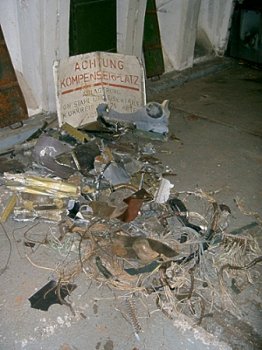
This is an idea of how much
junk was removed from the aircraft by Tom - including the sign at
the rear!
"We already were able to take
the huge dent out of the exhaust from the plane, it was about one third
dented in from the bottom. We used some wooden blocks and a 2 tonne
car floor jack to take the dent out; what can I say, it worked perfectly.
Now, I just need to fill in the little cracks and then prime this part
of the plane. We used the same process to take a dent out from on top
of the intake of the plane working our way to it through the radar compartment."
"So, we are making progress and
I hope to celebrate the "Roll-out" in the fall of 2005."
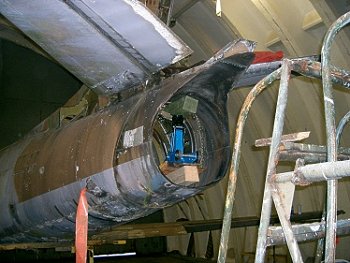
A large dent in the tail
cone was removed the old-fashioned way by jacking the damage out.
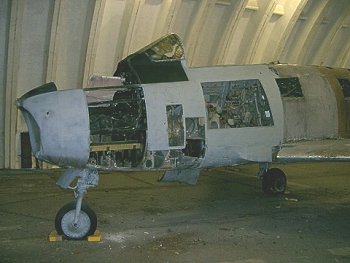
Views of
c/n 1111 on arrival at Neuhardenberg (left) and after much work had
been done to begin the tidying up process, November 2004 (right).
History of Canadair
Sabre 5 c/n 1111
This aircraft was built by Canadair
at Cartierville, Montreal, Canada in 1954 as a Sabre 5. It was assigned
construction number 1111 and Royal Canadian Air Force (RCAF) serial
number 23321. Taken onto RCAF strength on 2 July 1954, the aircraft
flew for the first time on 25 August 1954, and flew at least one sortie
for Canadair publicity photographs to be taken; at this time the aircraft
was painted in overall natural metal colours with just the c/n '1111'
on the forward fuselage and tail fin, along with the standard Canadian
markings.
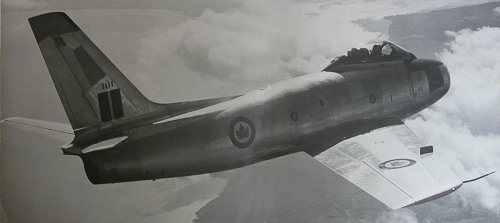
c/n 1111 pictured on a test
flight from Cartierville, Summer of 1954. Finish was overall natural
metal with the number '1111' on tail and forward fuselage.
The aircraft was subsequently
ferried to France for service with 439 Sqn at Marville, and would presumably
have gained a camouflage scheme by this time. However, 439 Squadron
did not receive Sabre 5s until April 1955 at the earliest, so there
is a 'gap' of at least nine months between 23321 flying in Canada and
being assigned to 439 in France – maybe the aircraft flew as a chase
plane for Canadair?
Once in service with 439 Squadron,
23321 gained the fuselage code 'IG-321' and would have been painted
in the squadron's 'Sabre Tooth Tiger' tail markings. With 439 Squadron
receiving Sabre 6s from June 1956, 23321 was retired in 1957 and was
ferried to Scottish Aviation's overhaul facility; it was struck off
RCAF charge on 8 August 1957.
The aircraft was one of 75 chosen
to equip the first German Luftwaffe Sabre unit –Waffenschule 10 (Weapons
School 10 - WS10) at Oldenburg and after overhaul with Scottish Aviation
at Renfrew was transferred to the Luftwaffe on 3 May 1958. Whilst in
Scotland, the aircraft gained the 1. Staffel code 'BB-131', which was
painted in large figures on the forward fuselage. Circa May 1958, c/n
1111 was transferred to 3./WS10 and re-coded 'BB-237'.
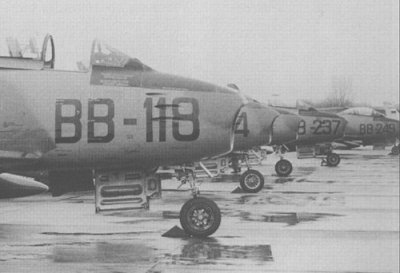
c/n 1111 (fourth in line)
in service with WS10 at Oldenburg. By this time (post-May 1958), the
aircraft carried the code 'BB-237'.
With the advent of Sabre 6s for
the Luftwaffe, and with the Sabre 5 training programme complete, c/n
1111 was struck off Luftwaffe charge and transferred to Dornier on 21
March 1962. Its whereabouts are then somewhat hazy, but the aircraft
was then noted on the military side of the Porz-Wahn base near Köln
in 1969. It was initially used as a monument, still bearing WS10 markings
and was displayed in front of the Luftwaffe Materiel Command building
on the base. Circa 1982 the aircraft moved to a new fire/rescue role
at Wahn and its condition began to deteriorate; the canopy was smashed
and the machine gun blast panels appear to have been removed at around
this time. Over the years at Wahn, the rudder, radar compartment access
door, gun bay doors and most of the access doors from the upper fuselage
also disappeared. The aircraft was demilitarised in 2003 before being
offered for sale, much of the forward fuselage skin was cut and ripped
open and also the gun camera from the intake was removed.
In 2003 the aircraft was sold to a private collector in the Netherlands
and briefly moved to Baarlo.
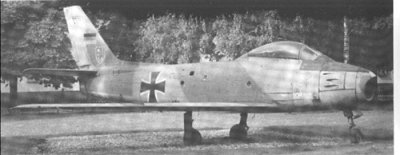
c/n 1111 on display at Wahn
in the 1970s.
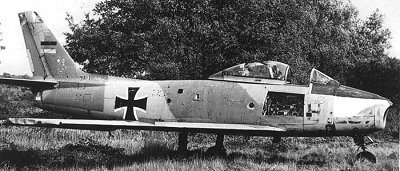
The same machine serving
with the Wahn fire service; note missing panels etc.
If you can help Tom Heldt
with spare parts or assistance - in fact anything related to his Sabre
5, he would be very keen to hear from you via email at: SabreBB237@aol.com
|